EkLine scheduled documentation agents
Documentation drifts out of date the moment code ships. New features go undocumented, tutorials fall behind, and stale README files mislead users. Catching these problems manually is tedious and easy to forget.
Scheduled agents handle this for you. Each agent runs a prompt on a recurring cadence — hourly, daily, weekly, or monthly — and delivers the results as a pull request, a Slack message, or both. You set it up once, and EkLine keeps your docs accurate without ongoing effort.
What you can automate
Section titled “What you can automate”EkLine provides pre-built templates that cover the most common documentation maintenance tasks. Each template is a proven prompt that the agent runs on every scheduled execution. You can also write your own prompt from scratch.
Quality and accuracy audits
Section titled “Quality and accuracy audits”These templates catch problems before your users do.
| Template | What it does |
|---|---|
| Docs Drift Review | Audits recent GitHub activity — across a lookback window you set, 30 days by default — for customer-facing changes that lack documentation, then fixes the highest-priority gap. |
| Code Sample Review | Verifies that code samples in your docs are accurate and runnable against the APIs and SDKs they demonstrate, then opens a PR fixing accuracy issues. |
| Doc UI Accuracy Review | Checks that your docs match the current frontend UI — labels, navigation paths, element placement — and opens a PR fixing UI drift. |
| Image Alt Audit | Scans documentation images for missing or low-quality alt text and fixes up to 20 images per run for accessibility compliance. |
| README Review | Audits your README.md against the current codebase and fixes inaccurate installation steps, dependencies, configuration, examples, or API references. |
Content discovery and growth
Section titled “Content discovery and growth”These templates find gaps and create new content.
| Template | What it does |
|---|---|
| Tutorial Gap Review | Analyzes your product, audience, and competitor docs to identify the most important missing tutorial or how-to guide, then writes it. |
| Persona IA Review | Reviews your docs from representative user personas and fixes the highest-ranked information architecture issue on their journey. |
| Docs SEO Review | Audits page titles, descriptions, headings, and internal links against your company marketing keywords, then fixes the highest-impact issue. |
| FAQ Structured Data | Adds or fixes FAQPage JSON-LD on FAQ documentation pages so they qualify for search engine rich results, capped at five file changes per run. |
Reporting and communication
Section titled “Reporting and communication”These templates keep your team informed without manual effort.
| Template | What it does |
|---|---|
| Release Notes Generator | Generates structured release notes from completed tickets and GitHub activity since the last release-notes update. |
| Release Marketing Brief | Drafts a Slack-ready brief of significant user-facing features that shipped in the last seven days, as raw material for marketing and CS teams. |
| EkLine Work Report | Generates a stakeholder-facing report of EkLine docs activity across all repos for the last seven days — what shipped, what is waiting, and what is open. |
| Pylon Support Review | Clusters recent Pylon support tickets by theme into a prioritized report of documentation gaps, delivered wherever you direct or inline in Slack. |
How it works
Section titled “How it works”Every scheduled agent follows the same lifecycle:
- You configure it — Pick a template or write a custom prompt, set a schedule, and choose how to receive results.
- EkLine runs it — At each scheduled time, EkLine creates a Docs Agent session and executes your prompt against the connected repository.
- You get the results — Depending on your notification settings, the agent raises a pull request with its changes, posts a summary to Slack, or both.
- You review — Open the pull request to review and merge, or click a run in the history to view the full agent session.
Before you begin
Section titled “Before you begin”You need:
- An EkLine account with Docs Agent enabled.
- At least one repository connected to EkLine.
Create your first agent
Section titled “Create your first agent”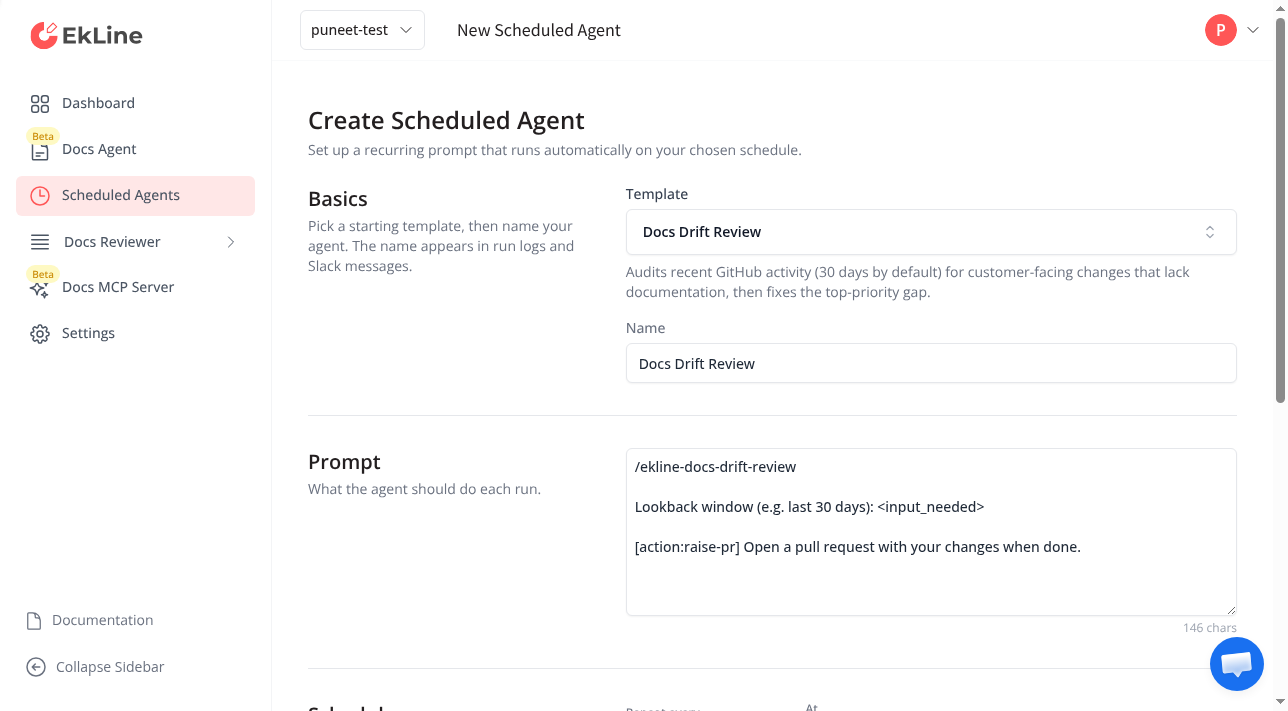
-
Click Scheduled Agents in the left navigation, then click New Agent.
-
Pick a template. The template picker defaults to the first available template and populates the name and prompt for you. Search by name or description to find a template that fits your goal, or select Custom agent at the bottom to write your own prompt.
-
Review the name. The agent name appears in run logs and Slack messages. When you select a template, EkLine auto-fills the name — edit it to match your team’s naming convention if needed.
-
Review and customize the prompt. The prompt defines what the agent does on each run. Templates give a proven starting point that you can edit. If a template includes a highlighted
<input_needed>placeholder, replace it with your value before saving. -
Set the schedule. Select a frequency — hourly, daily, weekly, or monthly — a repeat interval, such as every 2 weeks, and the time of day. A preview shows the next five run times. All times display in your local timezone.
-
Configure notifications. Enable Raise a pull request to have the agent open a PR with its changes. Enable Send a Slack notification and enter a channel name (for example,
docs-team) to receive a summary in Slack. -
Click Create Agent.
The agent appears in your list and runs automatically at the next scheduled time.
Templates that require input
Section titled “Templates that require input”Several templates ask you to provide a value specific to your organization:
| Template | Required input | Example |
|---|---|---|
| Docs Drift Review | Lookback window to audit | last 30 days |
| Docs SEO Review | Your company marketing website URL | https://www.example.com |
| README Review | Repository name | my-org/my-repo |
| Pylon Support Review | Lookback window to review, and where to deliver the report | last 30 days; post to Slack channel #docs-team |
The Docs Drift Review and Pylon Support Review templates set the lookback window when you schedule them, rather than assuming a fixed period. The form prevents saving until you replace each <input_needed> placeholder with a real value.
Write effective custom prompts
Section titled “Write effective custom prompts”If you select Custom agent, write a prompt that is self-contained and repeatable. The agent runs without human interaction, so include everything it needs.
Generate release notes for all tickets completed since thelast release. Organize by Features, Improvements, and BugFixes. Write for end users.Review the docs/ directory for outdated content. Flag anyreferences to deprecated APIs or removed features. Createa summary of what needs updating.Check if the README reflects the current project structureand dependencies. Update any outdated installationinstructions or configuration examples.Choose a schedule
Section titled “Choose a schedule”The schedule picker supports four frequencies, each with a repeat interval. All times display in your local timezone.
| Frequency | Options | Example |
|---|---|---|
| Hourly | Repeat every 1 to 24 hours | Every 2 hours |
| Daily | Repeat every 1 to 30 days, select the time of day | Every other day at 9:00 AM |
| Weekly | Repeat every 1 to 12 weeks, select one or more days and the time | Every 2 weeks on Monday and Thursday at 9:00 AM |
| Monthly | Repeat every 1 to 12 months, select the day of the month from 1 to 28, and time | Every 3 months on day 1 at 9:00 AM |
Use Repeat every to create interval schedules such as bi-weekly or every other day. The preview under the picker shows the next five run times so you can confirm the schedule before saving.
Manage your agents
Section titled “Manage your agents”Each agent row shows its primary controls inline: the enable toggle, the Run now play icon, a More actions (⋯) menu, and the expand chevron. Secondary actions — Skip next run, Edit, and Delete — live in the More actions (⋯) menu.
Run an agent immediately
Section titled “Run an agent immediately”Click the play icon on the agent row to trigger a run right away — useful for testing a new prompt without waiting for the next scheduled time. The run appears in the agent’s run history, and the system counts the next scheduled run from this one.
Skip the next run
Section titled “Skip the next run”Open the More actions (⋯) menu on the agent row and select Skip next run to skip the next upcoming run. The run after it happens as scheduled. Selecting Skip next run again before the skipped time passes also skips the following run.
Enable or disable an agent
Section titled “Enable or disable an agent”Toggle the switch next to any agent to enable or disable it. Disabled agents keep their configuration but stop running until you re-enable them.
Edit an agent
Section titled “Edit an agent”Open the More actions (⋯) menu on the agent row and select Edit to update the name, prompt, schedule, or notification settings. If you switch to a different template after editing the prompt, a confirmation dialog asks whether to replace your changes.
Delete an agent
Section titled “Delete an agent”Open the More actions (⋯) menu on the agent row, select Delete, and confirm the deletion. Deleting an agent removes it permanently, but links to earlier editor sessions from run history remain accessible.
View run history
Section titled “View run history”Expand any agent row by clicking the chevron to see its recent runs. Run history displays the five most recent executions, sorted from newest to oldest.
Each run shows:
| Element | Description |
|---|---|
| Status icon | Green checkmark for succeeded, red cross for failed, yellow clock for running |
| Timestamp link | When the run started — click to open the Docs Agent session with the full output |
Clicking a run link opens the editor where you can review everything the agent did, including the generated content, files changed, and any pull requests raised.
Next steps
Section titled “Next steps”- Create documentation — Generate READMEs, API references, and guides with custom prompts.
- Update and review — Keep documentation in sync with code changes.
- Integrations — Pull content from Slack, Notion, Linear, and more.